IPsec-Tools
安装
1.Ubuntu下apt安装。
2.编译源码安装
Ps:官方要已停止维护,但ubuntu有维护。
编译
下载源码
官网http://ipsec-tools.sourceforge.net
Ubuntu仓库https://packages.ubuntu.com/xenial/ipsec-tools
Ps:由于该源码依赖于linux 2.4.xxx版本内核。目前编译使用的内核版本为linux-2.6.7。
配置环境,编译
解压linux源码到/usr/src/ 目录下
重命名为./linux
解压ipsec源码,编译
配置解析
安装完后,详见setkey的man page。
shell
man setkey测试
配置虚拟机
使用4台虚拟机,两台做终端,两台做转发。
测试组网:
txt
                10.8.7.72<------------>10.8.7.73
                    ^                      ^
                    |                      |
                    V                      V
192.168.3.3<----->192.168.3.1 192.168.5.1<------->192.168.5.5| 虚拟机名称 | IP1 | IP2 | gateway |
|---|---|---|---|
| A | 192.168.3.3 | 192.168.3.1 | |
| B | 192.168.3.1 | 10.8.7.72 | 10.8.7.254 |
| C | 192.168.5.1 | 10.8.7.73 | 10.8.7.254 |
| D | 192.168.5.5 | 192.168.5.1 |
在虚拟机配置
虚拟机B和C上开启转发功能
shell
#路径:/etc/sysctl.conf
#修改内容:net.ipv4.ip_forward=1
#修改后重启设备。
sudo init 6配置ipsec隧道
shell
#虚拟机B上的配置如下:
spdadd 192.168.3.0/24 192.168.5.0/24 icmp -P out ipsec esp/tunnel/10.8.7.72-10.8.7.73/require;
spdadd 192.168.5.0/24 192.168.3.0/24 icmp -P  in ipsec esp/tunnel/10.8.7.73-10.8.7.72/require;
add 10.8.7.72 10.8.7.73 esp 24501 -m tunnel -E null -A hmac-sha1 "01234567890123456789" ;
add 10.8.7.73 10.8.7.72 esp 24502 -m tunnel -E null -A hmac-sha1 "01234567890123456789" ;

#虚拟机C上的配置如下:
spdadd 192.168.5.0/24 192.168.3.0/24 icmp -P out ipsec esp/tunnel/10.8.7.73-10.8.7.72/require;
spdadd 192.168.3.0/24 192.168.5.0/24 icmp -P  in ipsec esp/tunnel/10.8.7.72-10.8.7.73/require;
add 10.8.7.72 10.8.7.73 esp 24501 -m tunnel -E null -A hmac-sha1 "01234567890123456789" ;
add 10.8.7.73 10.8.7.72 esp 24502 -m tunnel -E null -A hmac-sha1 "01234567890123456789" ;

#执行:
sudo setkey -f ipsec.conf下发策略时,为了确保SPD跟SAD一一对应,需要为每队规则分配唯一的索引值,如下图
测试
1.192.168.3.3 ping 192.168.5.5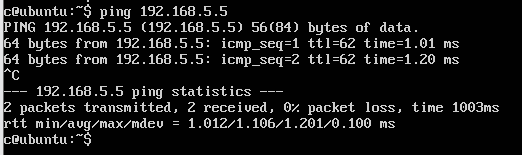
2.192.168.5.5 ping 192.168.3.3
这里只简单测试icmp报文,不再测试tcp或udp了。